• The plate in the tank
• Etching lines
• Electrotint (Microtint or Galv-tone)
• Perform different tests
• Applications
• Printing
The practical electro-etching process involves the following steps:
• Prepare the plate with the contact-strip, then degrease it very well and cover with your chosen ground or varnish.
• Fill your tank with a suitable electrolyte solution up to about 5cm from the rim of the container.
• Once you have finished drawing put the plate into the tank.
• The plate should be fully submerged in the tank, and opposite where you have already installed the cathode grid.
• The cathod plate (grid) and the plate to be etched are conected to the power supply
• The positive terminal attached to the plate which is to be etched and the negative terminal to the cathode (the other plate)
• Switch on the power supply
• Then the electric current flows and etching takes place.
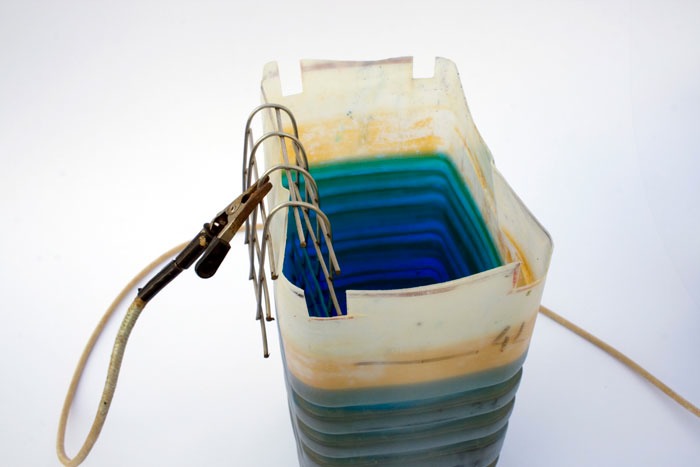
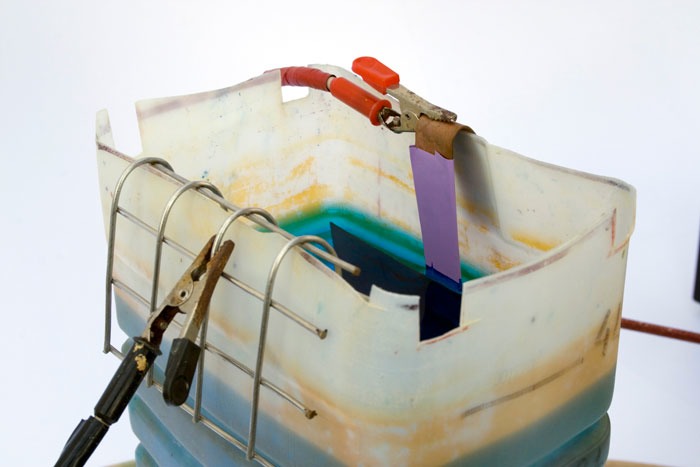
Tank filled with copper electrolyte, stainless steel cathode grid hanging at the tank side and connected with a crocodile clip
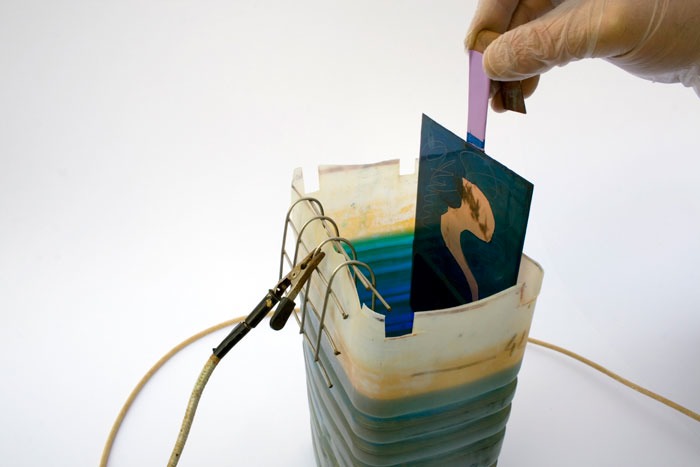
Holding the contact-strip, the plate to be etched is introduced to the electrolyte bath
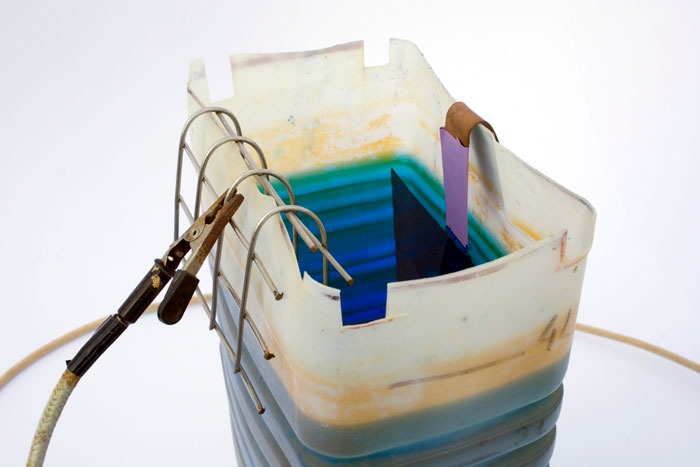
The plate is hung near the side of the tank, opposite (in parallel with) the cathode grid
• The plate should be placed at a distance of approximately 6cm from the cathode. Remember that the plate and cathode grid should be parallel across the whole surface and they should not be tilted.
• Connect the wires from the power supply with the help of some crocodile clips.
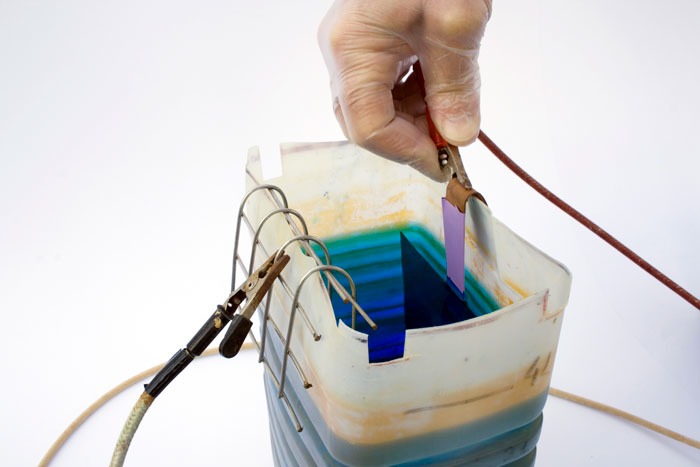
The plate is connected to the (+ pole) of the power supply by a crocodile clip
Tank, with cathode grid and anode plate connected, before switch on
• Next, switch on the power supply which regulates current with controlled voltage from 0 volts, until it reaches 0.5 volts. You will see how the amperage increases gradually - this depends on the amount of bare metal on the plate.
REMEMBER
• The CATHODE grid is connected to the BLACK negative pole (-)
• The ANODE contact-strip joined to the plate should be connected to the RED positive pole (+)
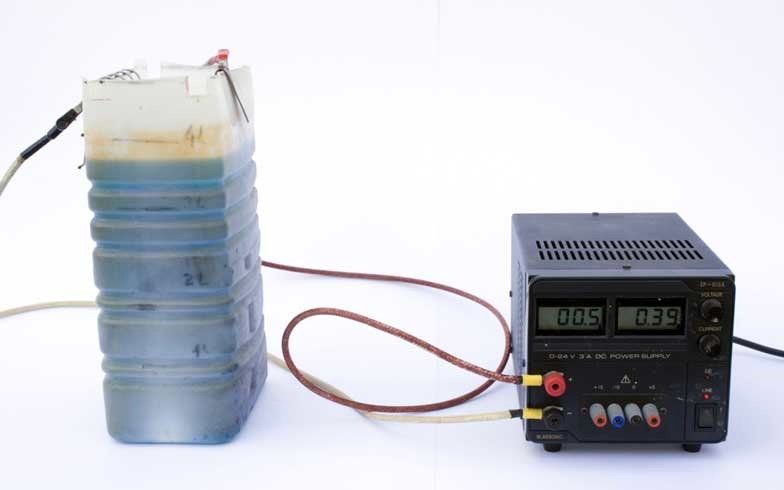
The power supply is switched on
Left screen indicates 0.5V
Right screen shows 0.39 Amperes
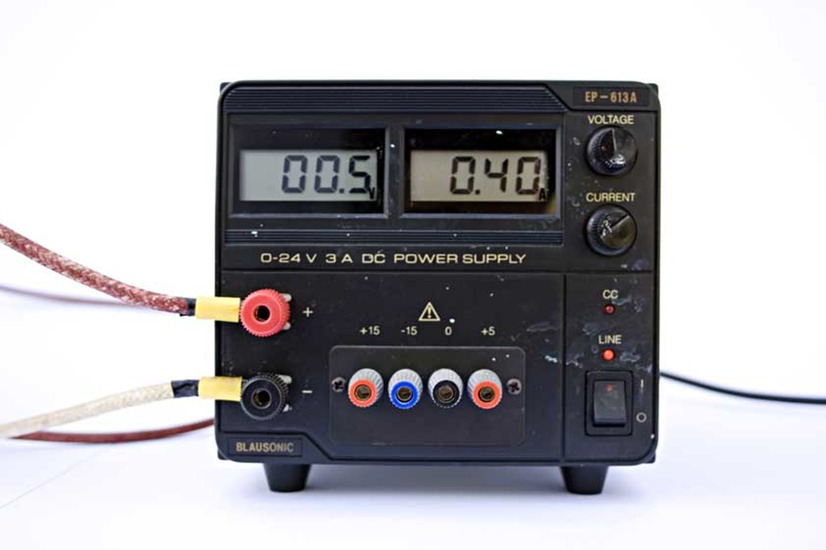
Keep the voltage at 0.5V (left screen)
In this case the resulting current is 0.4 amps (right screen) that is the current that is flowing proportionally to the metal being bitten
• Once the desired time has elapsed, switch off the power supply, remove the plate from the tank and flush it with water. See Washing plates and Safe Disposal.
Etching lines
You can protect the plate with any resists or grounds you desire. The time given for electro-etching lines on these metals should be ample. From 15 minutes onwards we can get printable lines.
Test at interval of 15 minute bites:
• Cover the plate with your chosen ground or varnish
• Drawing a series of separate needled lines together with cross-hatched lines
• Etch for 15 minutes. Keep the voltage at 0.5 V. Switch off the power supply. Remove the plate from the tank and flush it with water
• Cover any area with stop-out varnish, and then return the plate to the tank and repeat the process.
Step Test: electro-etching lines on COPPER PLATES
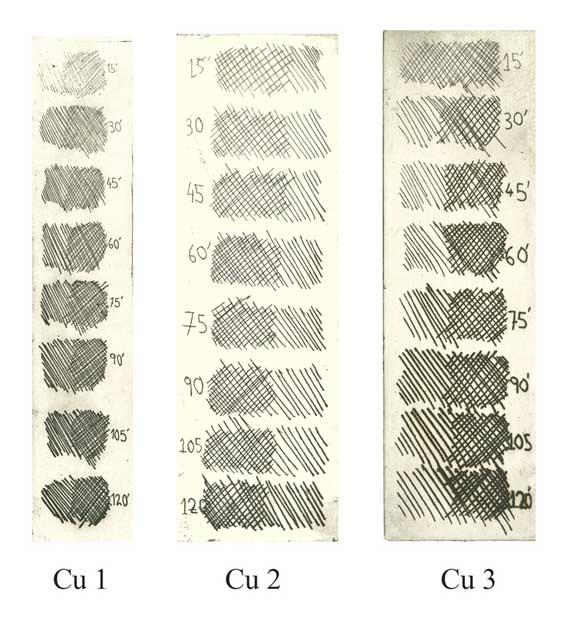
Cu 1 - Electrolyte concentration 160g to 1 Liter of water. Voltage 0.5V. Bitten at 15 minute intervals.
Cu 2 - Electrolyte concentration 250g to 1 Liter of water. Voltage 0.5V. Bitten at 15 minute intervals.
Cu 3 - Electrolyte concentration 160g to 1 Liter of water. Voltage 1.0V. Bitten at 15 minute intervals.
Step Test: electro-etching lines on ZINC PLATES
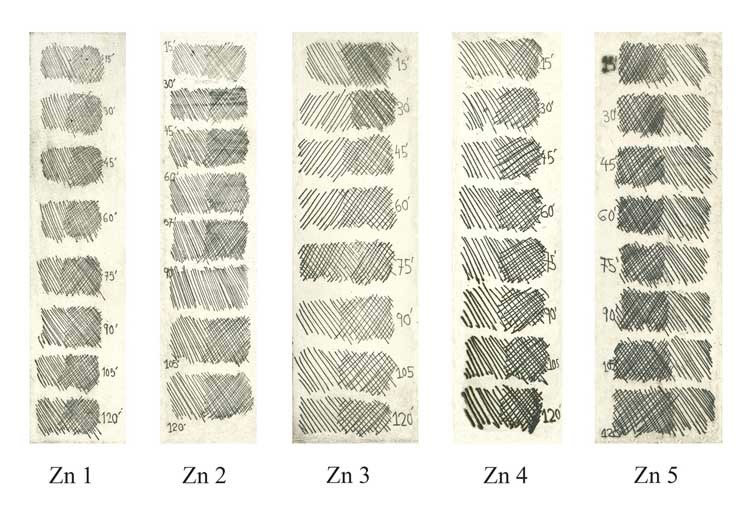
Zn 1 - Electrolyte concentration 160g to 1 Liter of water. Voltage 0.5V. Bitten at 15 minute intervals.
Zn 2 - Electrolyte concentration 250g to 1 Liter of water. Voltage 0.5V. Bitten at 15 minute intervals.
Zn 3 - Electrolyte concentration 300g to 1 Liter of water. Voltage 0.5V. Bitten at 15 minute intervals.
Zn 4 - Electrolyte concentration 300g to 1 Liter of water. Voltage 1.0V. Bitten at 15 minute intervals.
Zn 5 - Electrolyte concentration 500g to 1 Liter of water. Voltage 0.5V. Bitten at 15 minute intervals.
Electrotint (Microtint or Galv-tone)
Electrolytic action on an open area of the plate gives rise to a stippled matt surface on the bare metal that, when printed, produces a tone similar to aquatint.
To obtain tones like aquatint, you have simply to leave bare areas of metal. Electrolysis causes a rugged surface which will hold the ink like an aquatint. The richness of these tones depends on the structure and quality of the different metals used. If you want to get deep stippled areas for intense tones, it is best to etch in intervals of 15 minutes, rinsing the plate, allowing it to dry completely before etching again (without blocking the area) until you have etched the whole time proposed. Significantly, this method will produce more intense tones than one continuous etching of 60 or 90 minutes.
On copper, open bite generates a micro-dot with a scale of tones ranging from pale gray to the darkest and most intense tones using solutions of low concentration and low voltage. A voltage of 1.0 V does not produce a more intense tone of micro-dot.
Alternatively, you can apply a layer of intaglio ink to the plate with a roller (it is best to remove some of the ink from the roller on a newsprint sheet first). When ink is applied to the plate it creates a network of tiny ink dots that will block the whole plate or smaller areas where it has been applied, like an aquatint. Obviously this method requires skill to achieve good results.
You can make stop-outs with wax and lithographic pencils. You can also use splashes of varnish. A micro-dot can also be generated through galvanizing - by changing the polarity of the plates. If you wish, you can use traditional (but toxic) rosin or asphaltum to aquatint plates, but these have a tendency to lift off at certain stages in the electrolytic action. The challenge is not to use these toxic methods! Since turning away from acids, powdered and melted rosins, and methanol or turpentine cleaners the etching workshop has become a new space, so why not try out the new ways to AQUATINT.
I have not experimented with modern methods of acrylic aquatint applied using an airbrush, since you need two layers of varnish to resist electro-etching. Perhaps using an acrylic spray aquatint and etching for about 10 minutes and then continuing to apply acrylic sprays and etching for several intervals, will produce interesting results?
There are so many more nuances to electro-etching than I have space to go into in this simple 'How-To' guide, and so much more experimenting to do!
Step Test: Electro-etching "micro-dots" by open bite on COPPER PLATES
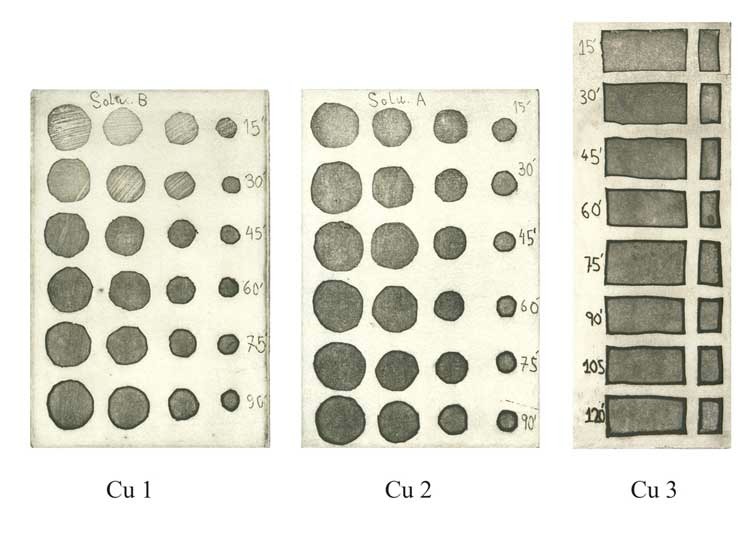
Cu 1 - Electrolyte concentration 160g to 1 Liter of water. Voltage 0.5V. Bitten at 15 minute intervals.
Cu 2 - Electrolyte concentration 200g to 1 Liter of water. Voltage 0.5V. Bitten at 15 minute intervals.
Cu 3 - Electrolyte concentration 250g to 1 Liter of water. Voltage 1.0V. Bitten at 15 minute intervals.
Step Test: electro-etching "micro-dots" by open bite on ZINC PLATES
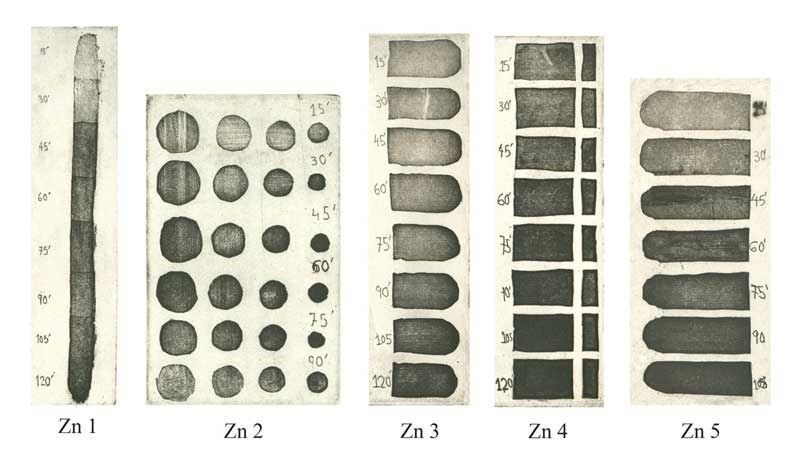
Zn 1 - Electrolyte concentration 160g to 1 Liter of water. Voltage 0.5V. Bitten at 15 minute intervals.
Zn 2 - Electrolyte concentration 200g to 1 Liter of water. Voltage 0.5V. Bitten at 15 minute intervals.
Zn 3 - Electrolyte concentration 300g to 1 Liter of water. Voltage 0.5V. Bitten at 15 minute intervals.
Zn 4 - Electrolyte concentration 300g to 1 Liter of water. Voltage 1.0V. Bitten at 15 minute intervals.
Zn 5 - Electrolyte concentration 500g to 1 Liter of water. Voltage 0.5V. Bitten at 15 minute intervals.
Perform tests using different:
• concentrations of electrolyte
• voltage (within safe limits)
• time
• distance between poles
Applications
The great thing with electro-etching is that you can experiment with all kinds of varnishes, acrylic and oil based. You can apply all the usual techniques of intaglio. You can also use transfers and photopolymer sheets on the plates. You can experiment with the nuances of galvanography. Electrolytic processes offer the printmaker a multiple possibilities.
Printing
Any plate that has been etched using the electrolytic processes described above can be printed in the usual manner. See sections on printing your plate in the INTAGLIO MANUAL and BEGINNERS COMPENDIUM.